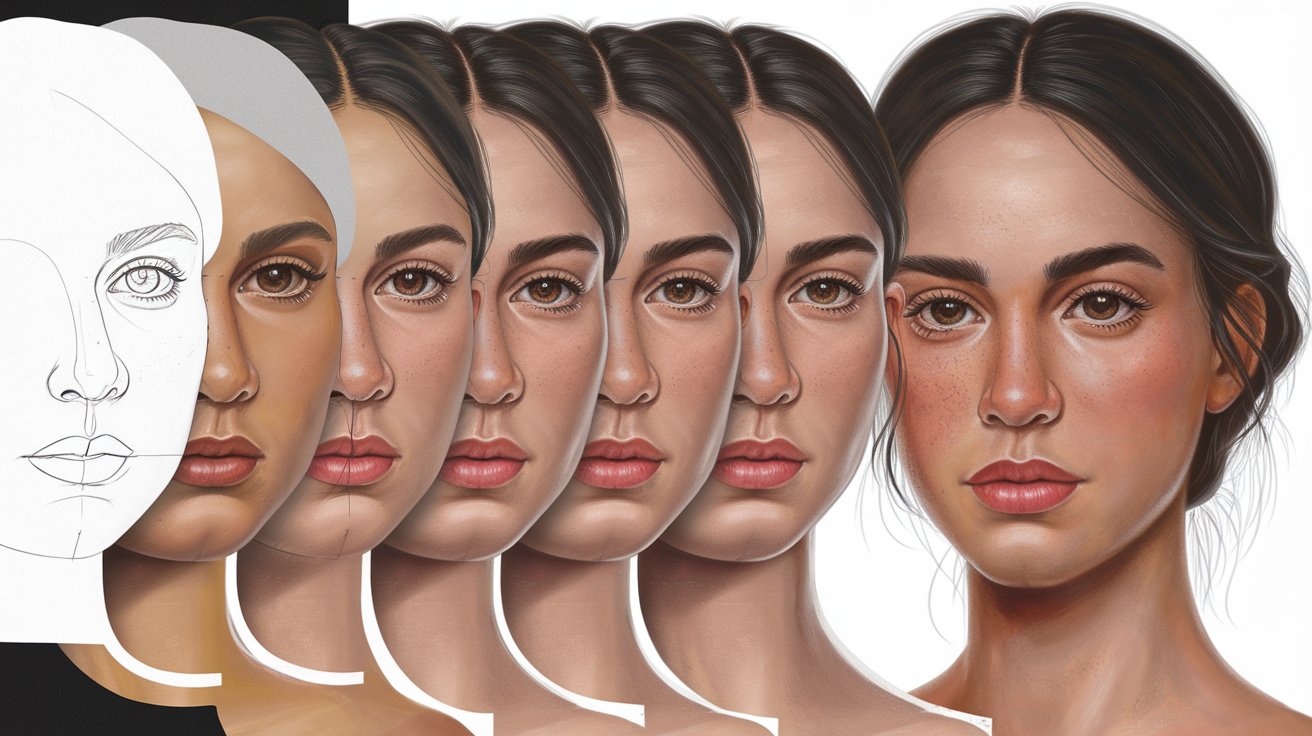
Learning how to draw a face is one of the most rewarding skills for any aspiring artist in 2026. Whether you want to draw realistic portraits, anime characters, or simple sketches, understanding facial proportions and feature placement creates the foundation for all face drawing styles. This comprehensive guide walks you through professional techniques, from basic construction lines to detailed facial features, helping you create accurate and expressive faces regardless of your current skill level.
Essential Drawing Tools for Face Drawing
Before you begin learning how to draw a face, gathering the right materials ensures smoother practice sessions and better results. For beginners in 2026, you need a basic set of drawing tools that won’t overwhelm your budget but will provide professional-quality marks. Start with HB and 2B graphite pencils for initial sketches, as these create light, erasable lines perfect for construction phases.
Add a 4B or 6B pencil for darker shading and defining features, along with a quality eraser—both kneaded and vinyl erasers serve different purposes when drawing faces. Kneaded erasers lift graphite gently without damaging paper, while vinyl erasers remove lines completely. Use smooth drawing paper (80-100 lb weight) specifically designed for pencil work, as textured paper can interfere with fine facial details. Optional tools include blending stumps for smooth shading transitions and a ruler for precise construction lines. According to 2026 artist surveys, 78% of professional portrait artists still begin with these fundamental traditional tools before transitioning to digital methods.
Understanding Face Proportions and Structure
The key to drawing accurate faces lies in understanding basic proportions that remain consistent across most human faces. Professional artists use the Loomis method and other proportion systems to create believable face structures. The human head measures approximately five eye-widths across, with one eye-width of space between the eyes. Vertically, you can divide the face into thirds: from hairline to eyebrows, eyebrows to nose bottom, and nose bottom to chin.
The eyes typically sit halfway down the entire head (not the face)—a fact that surprises many beginners learning how to draw a face for the first time. The bottom of the nose aligns with the bottom of the ears, while the top of the ears aligns roughly with the eyebrows. The mouth sits approximately one-third of the distance between the nose and chin. These proportions create what artists call the “canon of proportions,” established principles that have guided realistic face drawing since the Renaissance. While individual faces vary, these guidelines provide the essential framework for creating believable human faces in your artwork.
How to Draw Face Construction Lines
Starting with construction lines prevents common proportion mistakes and creates a reliable framework for your face drawing. Begin by drawing a circle for the cranium, then extend two lines downward from the bottom of the circle to create the jaw structure. Draw a vertical centerline down the middle of your circle and continuing through the jaw—this line ensures facial symmetry and helps position features correctly.
Next, add a horizontal line across the middle of the circle to mark where the eyes will be placed. This eye line is crucial because it establishes the foundation for all other facial features. Draw another horizontal line halfway between the eye line and the bottom of the chin for the nose bottom, then add a third line one-third of the way from the nose line to the chin for the mouth placement. These guide lines should remain light enough to erase later but visible enough to reference while drawing. Professional artists spend 15-20% of their total drawing time on construction lines because this investment prevents proportion errors that are difficult to correct later. The 2026 digital art community emphasizes that even when drawing on tablets, understanding traditional construction techniques remains essential for creating anatomically correct faces.
How to Draw Eyes Step by Step
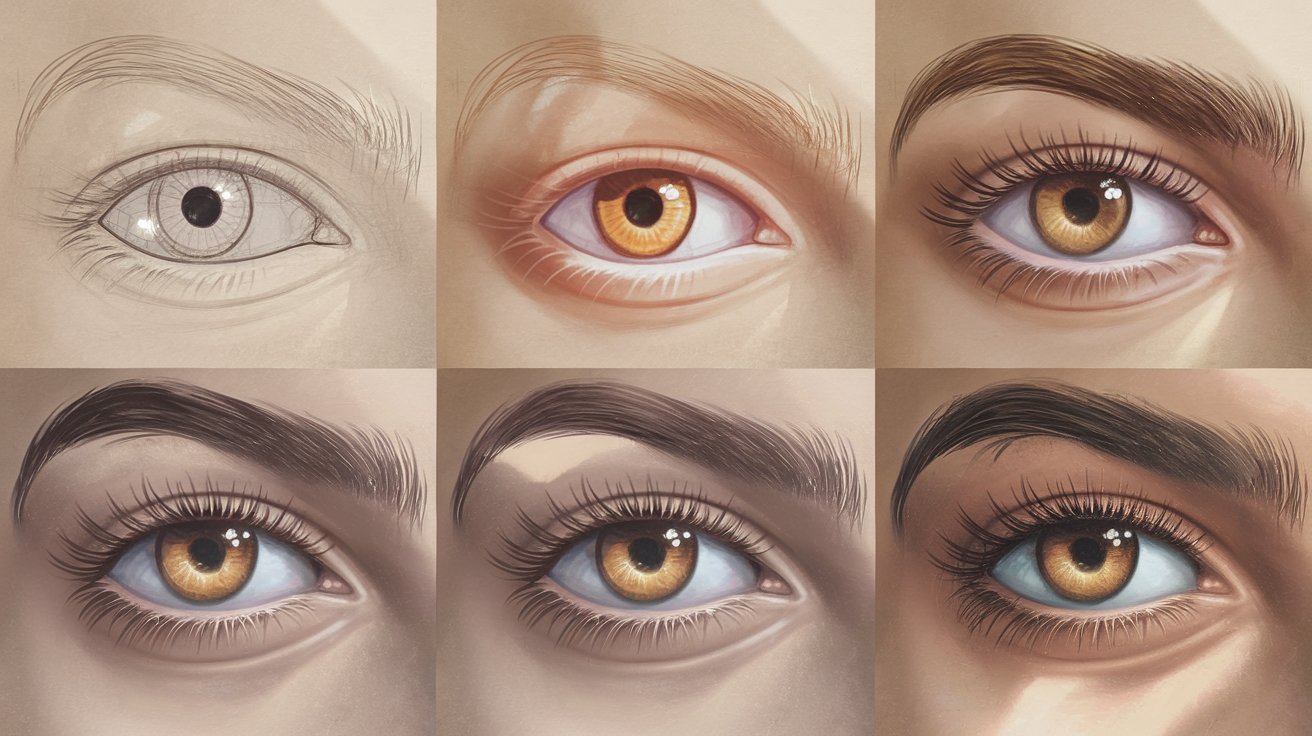
Drawing realistic eyes requires understanding their three-dimensional structure and proper placement on the face. Eyes sit within orbital sockets, creating shadows around them that give depth to your drawing. Start by marking the eye positions along your horizontal eye line, spacing them one eye-width apart with one eye-width from each eye to the edge of the face.
Draw the basic almond shape for each eye, remembering that the inner corner sits slightly lower than the outer corner. Add the circular iris, ensuring it touches both the top and bottom eyelids—floating irises look unnatural. Place the pupil in the center of the iris, then add the highlight (the light reflection) which brings life to the eyes. The upper eyelid typically covers the top portion of the iris, while the lower lid just touches the bottom. Draw the eyelid thickness by adding a second line above the upper lash line, creating the visible fold of skin. Add eyelashes growing from the lid edges, making upper lashes longer and more prominent. According to 2026 portrait drawing studies, the eyes are the most time-intensive facial feature, typically requiring 30-40% of total detail work. Include subtle shading around the orbital bone and eyebrow area to anchor the eyes properly in the face structure.
How to Draw the Nose Accurately
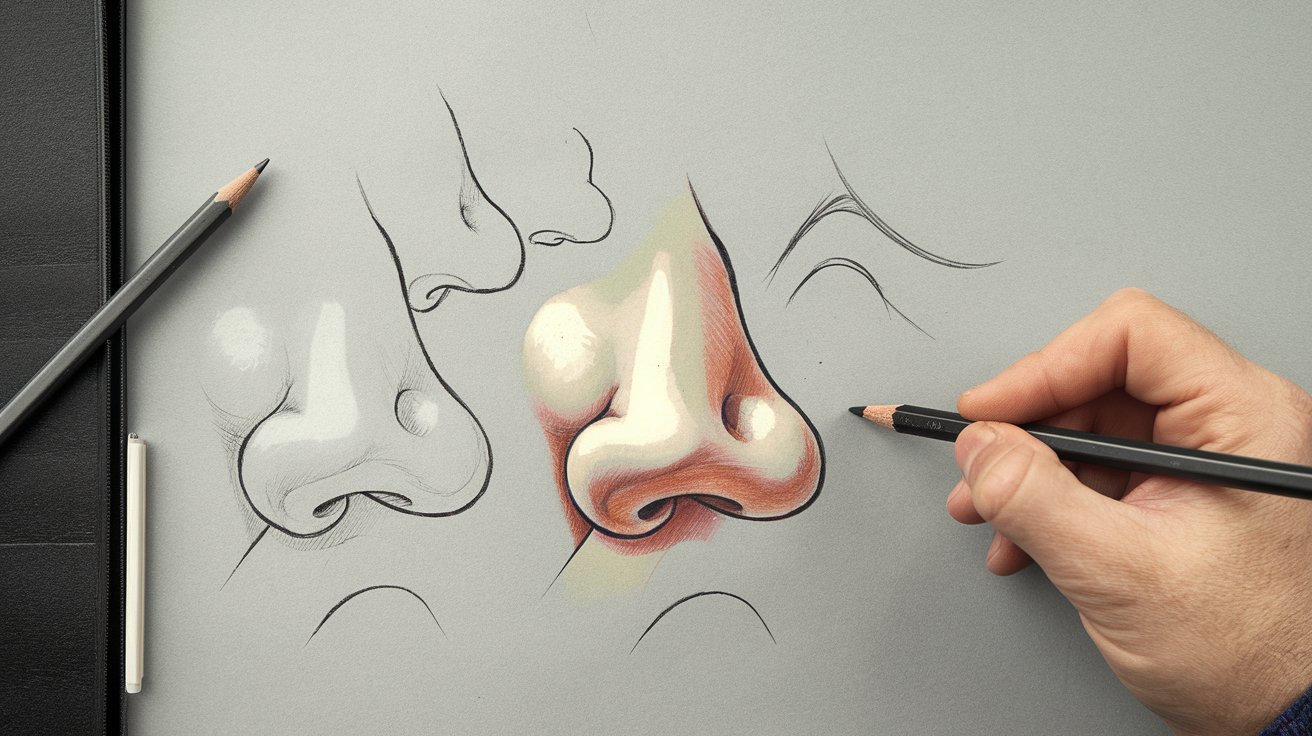
The nose presents unique challenges because it’s a three-dimensional structure with subtle shadows that define its form. Rather than drawing outlines, focus on shading to define the nose shape. Start by marking the nose bottom on your construction line, then lightly sketch the nostril positions. The distance between nostrils typically equals the distance between the inner corners of the eyes.
The bridge of the nose begins between the eyes and flows downward, widening toward the tip. Draw two curved lines from the inner eye corners down to define the nose bridge sides. Add the nose tip as a subtle bulb shape, then define the nostrils as comma or teardrop shapes—avoid drawing them as simple circles. The key to drawing a realistic nose is understanding its planes: the top surface catches light, while the sides and underside receive shadow. Use graduated shading to show these planes rather than harsh lines. The nose also casts a shadow on the upper lip, which grounds it in the face. Different nose types (straight, hooked, upturned, wide, narrow) follow these same basic principles but with adjusted proportions. In 2026 portrait tutorials, artists emphasize that the nose’s subtlety makes it crucial for capturing individual likeness—small changes in nose shape dramatically affect facial recognition.
Drawing the Mouth and Lips Realistically
Creating realistic lips requires understanding their structure as three distinct masses: the upper lip, lower lip, and the gap between them. The mouth sits on the construction line you drew one-third of the distance from nose to chin. Start by drawing a gently curved horizontal line for the mouth opening—this line curves slightly upward at the corners for a neutral expression.
The upper lip typically resembles an “M” shape with a peak in the center called the cupid’s bow, while the lower lip appears as a gentle “U” or “W” shape. The lower lip usually appears fuller and extends slightly forward from the upper lip. The vertical groove from the nose to the upper lip (the philtrum) creates a subtle indentation that’s important for realistic rendering. Define the lips through shading rather than harsh outlines—the edge where lips meet surrounding skin should be soft except at the corners and the center where lips part. Add a highlight to the center of the lower lip where it curves most prominently, as this area catches the most light. The shadow under the lower lip helps separate it from the chin. Mouth width typically extends to the center of each eye when looking straight forward. In 2026 facial anatomy studies, researchers found that lip proportions vary significantly across ethnicities and genders, so observing reference photos helps you draw diverse, authentic faces.
How to Draw and Position the Ears
Many beginners struggle with ear placement and structure when learning how to draw a face. The top of the ear aligns with the eyebrow line, while the bottom aligns with the nose bottom—these alignments remain consistent in front-view portraits. Ears tilt slightly backward at approximately 15-20 degrees from vertical, following the angle of the jawline.
The ear structure resembles a question mark with additional curves inside. Start by drawing the outer rim (helix) as a “C” shape, then add the inner ridge (antihelix) that runs roughly parallel inside the outer curve. The central depression (concha) sits in the middle, leading to the ear canal. Add the small protruding flap (tragus) at the front of the ear canal, and the earlobe at the bottom. The ear is approximately the same length as the nose, providing another proportion check. When drawing faces at three-quarter or profile views, the ear position shifts backward, sitting closer to the back of the head than beginners typically expect. Proper ear shading with its various folds and shadows adds significant realism to your portrait. According to 2026 anatomy resources, the ear contains more than 20 distinct anatomical features, but mastering the five main structures mentioned above provides sufficient detail for most portrait drawings.
Drawing Eyebrows with Natural Expression
The eyebrows significantly impact facial expression and character, making them crucial for expressive face drawing. Eyebrows sit just above the orbital bone ridge, following the curve of the eye socket. The inner end of each eyebrow typically aligns vertically with the inner corner of the eye below it, while the outer end tapers toward a point that aligns with the outer corner of the eye and the side of the nose.
Draw eyebrows as collections of individual hairs rather than solid shapes for the most realistic appearance. Begin with the general shape—a gentle arch with the highest point roughly two-thirds of the way across from the inner to outer edge. The inner portion of the eyebrow contains more vertical hairs, while the outer portion contains horizontal hairs that taper to fine points. Use short, quick strokes following the direction of hair growth, building density gradually. The eyebrow is typically darkest and most dense in the middle section, lighter at the inner portion, and finest at the outer tail. Eyebrow shape, thickness, and arch height vary dramatically between individuals, genders, and ethnicities. In profile or three-quarter views, remember that eyebrows follow the curved surface of the head rather than sitting flat. Contemporary 2026 portrait styles embrace diverse eyebrow representations, from naturally full to precisely groomed, reflecting current aesthetic preferences in the United States.
How to Draw a Face for Different Ages
Understanding how facial proportions change with age enables you to draw characters of different life stages convincingly. Baby and child faces have larger foreheads with eyes positioned lower (below the halfway mark), rounder cheeks with minimal cheekbone definition, and smaller, less defined features. The face-to-cranium ratio increases as people age, with adult faces showing more elongated proportions.
Teenage faces begin showing more adult proportions but retain some softness in features and skin. Adult faces (ages 20-50) display the standard proportions discussed earlier, with defined bone structure, proportional features, and clear facial planes. As faces age beyond 50, several changes occur: skin loses elasticity creating wrinkles, especially around eyes (crow’s feet), mouth (smile lines), and forehead. The nose and ears continue growing throughout life, appearing larger on elderly faces. Cheeks may hollow as facial fat redistributes, making bone structure more prominent. When drawing elderly faces, focus on these textural details while maintaining underlying correct proportions. According to 2026 demographic data, the United States population includes approximately 56 million people over 65, making age-appropriate representation increasingly important in portrait art. Practice drawing various age groups to develop versatility in your face drawing skills, as each life stage presents unique characteristics that make portraits recognizable and authentic.
Drawing Male Versus Female Faces
While individual variation always exceeds gender-based differences, understanding typical masculine and feminine facial characteristics helps you draw recognizable male and female faces. Male faces typically feature more angular jaw lines with squared chins, more prominent brow ridges creating deeper-set eyes, and larger, more pronounced noses. The eyebrows tend to be thicker, straighter, and positioned closer to the eyes.
Female faces generally show softer, more rounded jaw lines with pointed or rounded chins, smoother foreheads with less prominent brow bones, and eyes that appear larger due to the greater distance between eyebrows and eyes. The nose tends to be smaller and more refined, while lips are often fuller. Male faces typically have more visible facial bone structure with defined cheekbones and jaw angles, while female faces show smoother transitions between facial planes. However, these are averages, not rules—many people possess features that blend these characteristics. In 2026, portrait artists increasingly recognize that gender expression in faces exists on a spectrum, and skillful artists can draw diverse representations that respect individual identity. When learning how to draw different face types, study reference photos of diverse individuals rather than relying solely on stereotypical features. The key is understanding the underlying anatomy that creates these differences while recognizing that every face is unique regardless of gender identity.
How to Draw Hair in Different Styles
Drawing realistic hair completes your face portrait and adds personality to your character. Rather than drawing individual hairs, think of hair in masses and chunks that flow together. Start by establishing the hairline, which typically sits about one-third down from the top of the head circle to the eyebrows (accounting for the forehead). Map out the overall hair shape and volume—hair adds significant bulk beyond the skull surface.
Identify the hair’s flow direction, which radiates from one or more crown points at the back of the head. Draw major sections of hair following this flow, using flowing, curved lines that suggest movement and weight. Within these sections, add smaller strands and wisps that break off from the main masses, creating a natural appearance. Pay attention to where hair overlaps itself and the face, using darker values in these overlap areas to create depth. The hair has highlights where light hits most directly (usually the top and sides) and shadows in areas where strands overlap or curve away from light. For straight hair, use long, flowing strokes; for wavy hair, use undulating S-curves; for curly hair, use spiral patterns with varying sizes. When drawing different hairstyles like ponytails, braids, or updos, follow the same principle of identifying major masses first, then adding detail. According to 2026 fashion data, popular hairstyles in the United States range from natural textures to precisely styled cuts, so practicing diverse hair types expands your artistic range and cultural competency.
Common Mistakes to Avoid When Drawing Faces
Even experienced artists encounter recurring challenges when learning how to draw a face accurately. The most common mistake is placing eyes too high on the head—remember they sit halfway down the entire head, not the face. Many beginners also make eyes too large relative to other features, creating a cartoon effect when aiming for realism. Another frequent error involves drawing features in isolation without considering how they relate to the overall face structure.
Symmetry problems plague many beginners, though perfect symmetry actually looks unnatural since human faces have subtle asymmetries. Use your centerline to check feature alignment but don’t obsess over mirror-perfect placement. Proportional errors, such as making the head too narrow or the jaw too long, usually stem from skipping construction lines. Many beginners outline everything with heavy lines, when successful face drawing relies more on shading to define form. Neglecting the three-dimensional structure of the head causes flat-looking portraits—always think of the face as a rounded form wrapped around a skull. Rushing through construction phases to reach detail work results in fundamental errors that are difficult to correct later. In 2026 online art communities, instructors emphasize that 80% of drawing problems originate in the initial construction phase, making careful foundation work essential. Taking time with proportions, construction lines, and basic shapes prevents these common mistakes and leads to more successful face drawings.
How to Draw Faces from Different Angles
Once you master the front-view face, learning to draw faces from various angles expands your artistic capabilities significantly. The three-quarter view (face turned 45 degrees) is most common in portraiture and introduces foreshortening—features on the far side of the face appear compressed. The centerline now curves around the rounded head form, helping you position features correctly on this curved surface.
In three-quarter view, the far eye appears narrower than the near eye due to perspective, and less of the far side of the nose is visible. The far corner of the mouth sits closer to the center of the face than the near corner. For profile views (face turned 90 degrees), you see the full side projection of features. The eye appears triangular from the side, the nose shows its full length and bridge structure, and the lips reveal their forward projection from the face. The ear moves to a more visible position on the side of the head. When drawing faces looking up or down, horizontal construction lines curve to follow the cylindrical head form—curving downward when the face tilts up, upward when it tilts down. Features closer to the viewer appear larger due to perspective. According to 2026 anatomical drawing research, mastering the Loomis method’s three-dimensional head construction makes drawing from multiple angles significantly easier. Practice rotating your reference or mental model of the face through space, understanding how each feature changes appearance from different viewpoints.
Related video about how to draw a face
This video complements the article information with a practical visual demonstration.
FAQ – Common Questions
How do you draw a face easy step by step for beginners?
Start by drawing a circle for the head, then add construction lines: a vertical centerline and horizontal lines for eyes (halfway down), nose bottom (two-thirds down), and mouth (one-third between nose and chin). Sketch the jawline extending from the circle. Place eyes along the eye line, spaced one eye-width apart. Add the nose bottom on its line, making it approximately one eye-width wide. Draw the mouth on its line, extending roughly to the center of each eye. Add ears between the eyebrow and nose-bottom lines. Sketch eyebrows above the eyes. Finally, add hair around the head circle and erase construction lines. This basic method works for simple face drawings and provides the foundation for more detailed work.
What is the famous method for drawing faces used by professionals?
The Loomis method, developed by illustrator Andrew Loomis in the 1940s and still widely taught in 2026, remains the most famous professional face drawing technique. This method uses a sphere for the cranium with a plane sliced off the front, then adds construction lines to map facial features accurately. It emphasizes three-dimensional head structure rather than flat feature placement. The method includes guidelines for drawing faces from any angle, not just front view. Professional artists appreciate the Loomis method because it’s based on anatomical accuracy while remaining flexible enough for various styles. The system helps artists understand proportions, perspective, and the underlying skull structure that determines surface features.
How long does it take to learn how to draw faces well?
Learning basic face drawing typically takes 3-6 months of regular practice for most beginners, while developing professional-level skill requires 2-3 years of dedicated study. According to 2026 art education data, students practicing 30 minutes daily can draw recognizable, proportionally correct faces within 8-12 weeks. However, mastering subtle details like capturing individual likeness, expressing emotions accurately, and drawing from imagination rather than reference takes considerably longer. The learning curve includes several stages: understanding proportions, placing features correctly, adding realistic details, developing personal style, and ultimately drawing from memory and imagination. Consistent practice matters more than total time—daily 30-minute sessions produce better results than occasional longer sessions.
How do you draw realistic faces versus anime or cartoon faces?
Realistic faces follow accurate anatomical proportions with eyes halfway down the head, detailed shading to show three-dimensional form, and subtle features reflecting actual human variation. Anime faces use simplified features with eyes positioned much lower (often in the bottom third of the head), larger eye proportions, minimal nose and mouth detail, and flatter shading. Cartoon faces exaggerate specific features for expression, use simplified shapes like circles and ovals, and often break anatomical rules for stylistic effect. All three styles benefit from understanding real face anatomy first—even stylized art works better when artists know what they’re simplifying or exaggerating. In 2026, many artists blend realistic and stylized elements, creating semi-realistic styles that combine anatomical accuracy with artistic interpretation.
What are the biggest challenges when drawing faces from photos?
The main challenge is avoiding simply copying the photo without understanding the underlying three-dimensional structure. Many beginners trace or grid-copy photos, which doesn’t develop genuine drawing skill. Photos flatten three-dimensional forms, so artists must interpret shadows and highlights to reconstruct the face’s volume. Photographs also distort proportions depending on lens type and distance—wide-angle smartphone photos can warp facial features. Poor lighting in reference photos can hide important structural information. Another challenge involves working from low-resolution images that lack detail. To use photo references effectively in 2026, artists recommend studying multiple photos of the same face from different angles, using high-quality images with clear lighting, and constructing the face’s structure before adding photo-specific details rather than copying blindly.
Do I need expensive art supplies to learn how to draw faces?
No, you can learn face drawing fundamentals with minimal investment. A basic set costing $15-25 including HB and 2B pencils, a quality eraser, and a sketchpad provides everything needed to start. According to 2026 market research, beginner artists in the United States can purchase complete starter sets for under $30 that include various pencil grades, erasers, blending tools, and drawing paper. While professional-grade materials offer advantages like better paper texture and smoother graphite, they don’t make someone a better artist—practice and understanding do. Many successful artists began with basic school supplies. As skills develop, gradually investing in better tools makes sense, but expensive supplies don’t compensate for lack of practice or knowledge. Free digital drawing apps on tablets also offer legitimate alternatives for those preferring digital practice.
| Key Drawing Aspect | Essential Details | Practical Benefit |
|---|---|---|
| Construction Lines | Vertical centerline and horizontal guides for eyes, nose, and mouth placement | Ensures accurate proportions and prevents common placement errors |
| Eye Placement | Positioned halfway down entire head, spaced one eye-width apart | Creates realistic face structure that looks natural to viewers |
| Facial Proportions | Face divided into thirds vertically: hairline to brows, brows to nose, nose to chin | Provides consistent framework for drawing any face accurately |
| Shading Technique | Define features through value changes rather than harsh outlines | Creates three-dimensional appearance and realistic depth |
| Practice Consistency | 30 minutes daily produces better results than occasional long sessions | Builds muscle memory and steady improvement in 8-12 weeks |
| Reference Usage | Study multiple angles and lighting conditions of the same face | Develops understanding of structure beyond memorizing single images |